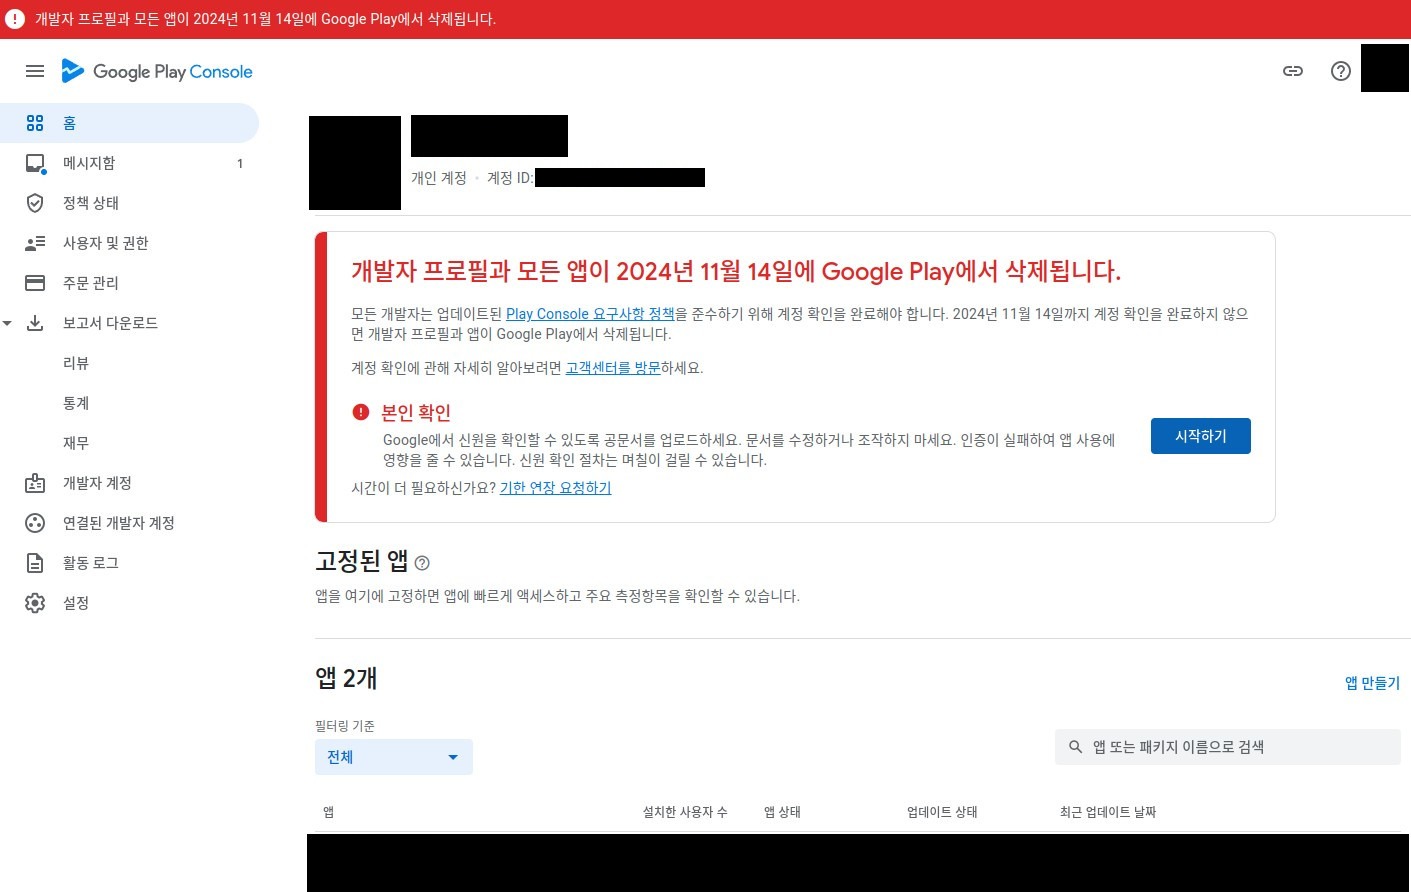
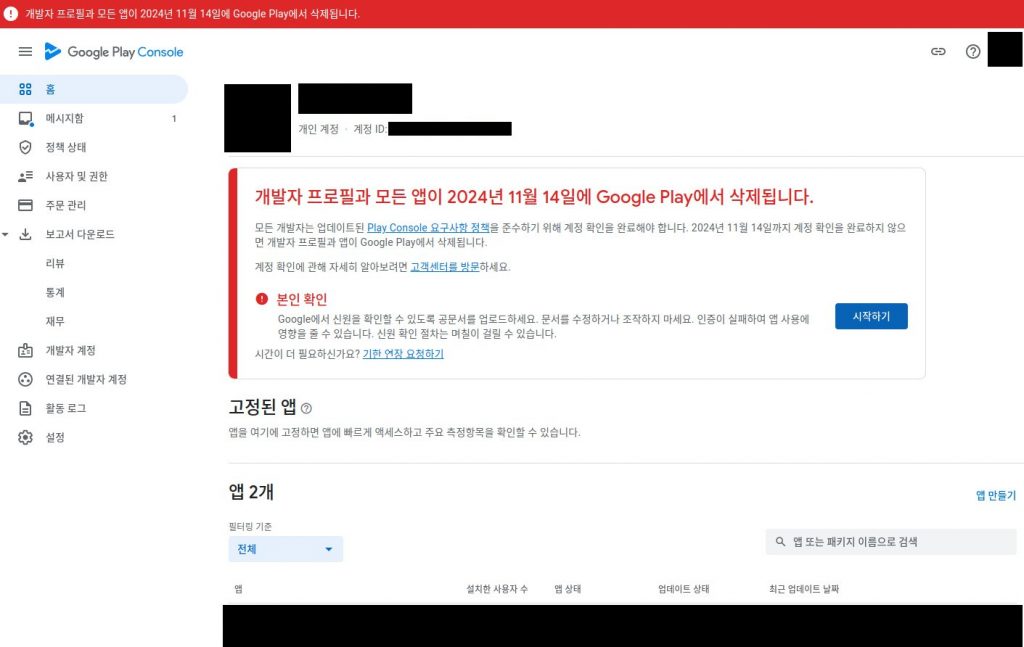
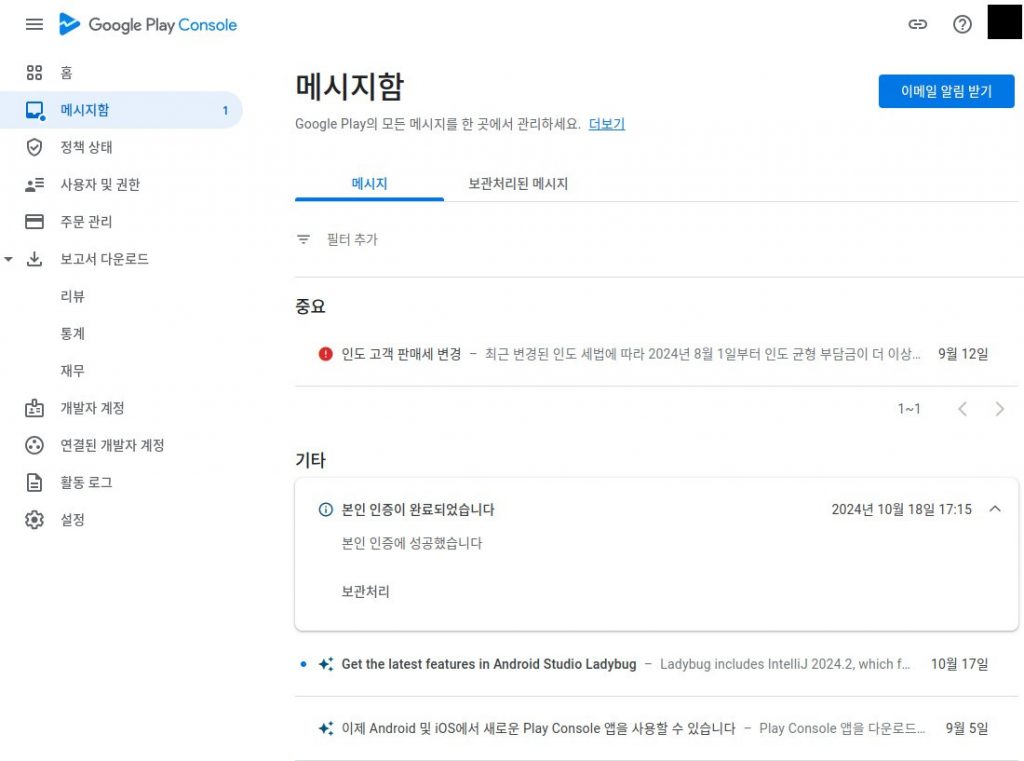
몇 달 전부터 구글 플레이 콘솔에 접속하면 아래와 같이 ‘개발자 프로필과 모든 앱이 2024년 11월 14일에 Google Play에서 삭제됩니다.‘라는 경고 창이 뜨기 시작하더군요. 실제로는 9월 며칠이었는데 8월 돼도 해결을 못하고 있으니 자동 기한 연장이 되었는지 11월 14일로 바뀌어서 나오네요.
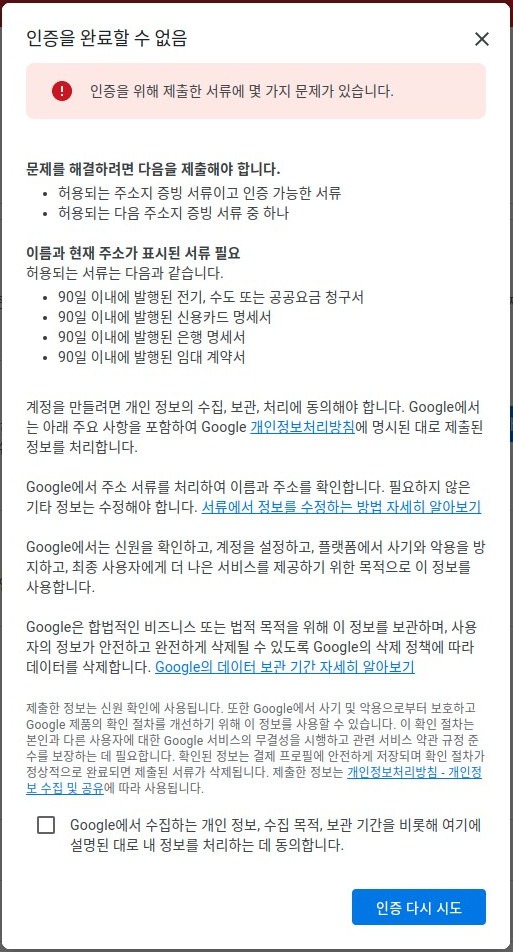
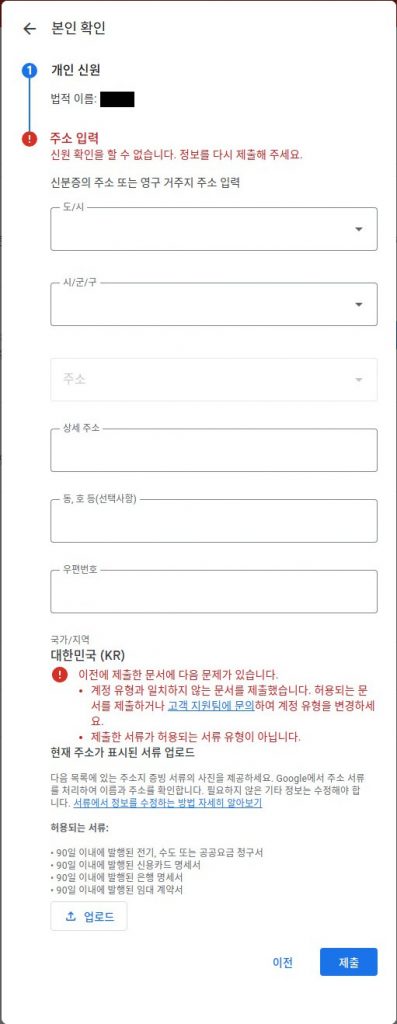
시작하기를 누르면 아래와 같이 나오네요.
사실 사진으로 찍지는 못했지만 인증할 때 처음 본인확인을 시도할 때는 계정 타입을 정하는 단계를 먼저 거치는데 제가 실수로 거기서 단체(?)가 아닌 개인으로 선택해버려서 개인 계정이 되어버렸습니다. ㅜㅜ;
다시 계정 타입을 바꾸려고 해봤는데 구글 플레이에는 사용자가 직접 변경할 수 없게 되어 있더라고요. 그래서 구글 플레이 고객 센터에 문의도 해보고 했지만 원하는 결과를 얻지는 못했습니다. (답변도 며칠이 걸리고 제대로 해주지 않더라고요. 영어로 했어야 했나??? ㅡ.ㅡ;; )
처음에는 개인 계정 된 것도 잘 몰라서 사업장 임대차 계약서 같은 거로 신청 넣어봤는데 계속 인증 실패되더라고요. 이것만 2주 이상 날려먹었네요. ㅜㅜ
아래와 같이 제출 문서에 문제가 있다고 나옵니다.
결국 해당 앱은 개인사업자 앱이라 개인으로 해도 크게 문제는 없을 거 같고 또한 구글 플레이에서 앱을 소개할 때 나오는 앱 제작자란은 따로 변경이 가능해서 그냥 개인 계정으로 진행하기로 했습니다.
구글링해 보니 개인 계정으로 진행하는 경우 위에 보듯이 개인 신원에 법적 이름이 나오는 부분에 출력되는 명의자의 주민등록등본으로 제출하면 빠르게 처리된다고 하더군요.
그래서 대표님께 양해를 구하고 주민등록등본을 발급받아 제출해 봤습니다.
2~3일 지나니 현재는 본인 인증이 완료되었다고 뜨네요. ㅎㅎ
본인 확인 시 이름은 플레이 스토어 앱 상세페이지에서 앱 지원 코너를 열어보면 개발자 소개에 노출됩니다.
이제는 애플 앱스토어보다도 더 깐깐해지고 있는 구글 플레이 본인 확인 절차 성공 후기였습니다. 읽어주셔서 감사합니다. ^^
참고 문서
구글 플레이 콘솔: https://play.google.com/intl/ko/console/about/
개발자 계정 유형 선택 도움말: https://support.google.com/googleplay/android-developer/answer/13634885?hl=ko#zippy=%2C%EC%A1%B0%EC%A7%81-%EB%98%90%EB%8A%94-%EB%B9%84%EC%A6%88%EB%8B%88%EC%8A%A4%EC%9D%98-%EA%B0%9C%EB%B0%9C%EC%9E%90-%EA%B3%84%EC%A0%95
Play Console 개발자 계정 생성에 필요한 정보 도움말: https://support.google.com/googleplay/android-developer/answer/13628312?sjid=4917175003656663547-AP
아래와 같은 /var/log/nginx/error.log 에 아래와 같은 오류 로그가 남아있었네요.
2024/03/21 13:53:38 [alert] 3280218#3280218: *1217 open socket #50 left in connection 73
2024/03/21 13:53:38 [alert] 3280218#3280218: *1271 open socket #22 left in connection 74
2024/03/21 13:53:38 [alert] 3280218#3280218: *1191 open socket #53 left in connection 76
2024/03/21 13:53:38 [alert] 3280218#3280218: *1255 open socket #27 left in connection 80
2024/03/21 13:53:38 [alert] 3280218#3280218: *1250 open socket #19 left in connection 82
2024/03/21 13:53:38 [alert] 3280218#3280218: *1319 open socket #91 left in connection 83
2024/03/21 13:53:38 [alert] 3280218#3280218: *1287 open socket #23 left in connection 85
2024/03/21 13:53:38 [alert] 3280218#3280218: *1032 open socket #108 left in connection 89
2024/03/21 13:53:38 [alert] 3280218#3280218: *1332 open socket #36 left in connection 92
2024/03/21 13:53:38 [alert] 3280218#3280218: *1280 open socket #78 left in connection 93
2024/03/21 13:53:38 [alert] 3280218#3280218: *1320 open socket #59 left in connection 94
2024/03/21 13:53:38 [alert] 3280218#3280218: *1311 open socket #35 left in connection 95
2024/03/21 13:53:38 [alert] 3280218#3280218: aborting
위와 같은 오류가 발생하고 실제 서버가 응답을 못하고 실 도메인에 붙인 가상 서버 로그 쪽에는 499 에러가 계속해서 뜨더군요.
최종적으로는 웹서버(reverse proxy), docker compose 로 운영 중인 웹서버+PHP-FPM+mariaDB 서버를 모두 재시작하고 나서야 정상적으로 돌아왔습니다.
위 로그 정보로 구글 검색해 보니 Debian 계열 배포본은 ulimit 확인 시 사용자 한도가 너무 낮게 설정되어 있어 에러가 발생할 수 있다고 하네요.
저 에러가 직접적인 웹서버 혹은 PHP-FPM 서버가 멈추는데 영향이 있는지는 모르겠지만 일단 아래와 같은 순서로 검사해서 Nginx 의 기본 설정 nginx.conf 에 설정을 추가해 주었습니다.
ulimit 으로 먼저 현재 한도를 확인합니다.
# ulimit -n
1024
Nginx 프로세스의 PID 값을 확인합니다.
# ps aufx | grep nginx
root 3460627 0.0 0.0 93992 3264 ? Ss 09:44 0:00 nginx: master process /usr/sbin/nginx -g daemon on; master_process on;
www-data 3460628 0.6 0.1 95616 13768 ? S 09:44 0:27 \_ nginx: worker process
www-data 3460629 0.0 0.1 94868 12052 ? S 09:44 0:00 \_ nginx: worker process
www-data 3460630 0.0 0.0 94300 5572 ? S 09:44 0:00 \_ nginx: worker process
www-data 3460631 0.0 0.0 94300 5572 ? S 09:44 0:00 \_ nginx: worker process
nginx worker process 중 아무거나 PID 값을 아래와 같이 넣어서 검사해 보세요
# cat /proc/3460628/limits
Limit Soft Limit Hard Limit Units
Max cpu time unlimited unlimited seconds
Max file size unlimited unlimited bytes
Max data size unlimited unlimited bytes
Max stack size 8388608 unlimited bytes
Max core file size 0 unlimited bytes
Max resident set unlimited unlimited bytes
Max processes 31638 31638 processes
Max open files 1024 524288 files
Max locked memory 65536 65536 bytes
Max address space unlimited unlimited bytes
Max file locks unlimited unlimited locks
Max pending signals 31638 31638 signals
Max msgqueue size 819200 819200 bytes
Max nice priority 0 0
Max realtime priority 0 0
Max realtime timeout unlimited unlimited us
결과를 보면 Max open files 에 Soft Limit 이 1024로 매우 낮게 설정되어 있습니다.
제가 볼 때 여기서 두 가지 해결방안이 있는데 시스템 전체 ulimit 값을 높게 설정하는 방법이 있고 아니면 nginx.conf 에 worker_rlimit_nofile 를 최대 Hard Limit 값까지 설정하는 방법이 있을 것 같습니다.
일단 시스템 영향이 없는 nginx.conf 설정을 하자면 아래와 같이 하면 됩니다. ( /etc/nginx/nginx.conf )
worker_rlimit_nofile 524288;
이후 웹서버를 재시작해 주면 됩니다.
이제 다시 검사를 해보면 아래와 같이 Soft Limit 도 높게 나옵니다.
# cat /proc/3460628/limits
Limit Soft Limit Hard Limit Units
Max cpu time unlimited unlimited seconds
Max file size unlimited unlimited bytes
Max data size unlimited unlimited bytes
Max stack size 8388608 unlimited bytes
Max core file size 0 unlimited bytes
Max resident set unlimited unlimited bytes
Max processes 31638 31638 processes
Max open files 524288 524288 files
Max locked memory 65536 65536 bytes
Max address space unlimited unlimited bytes
Max file locks unlimited unlimited locks
Max pending signals 31638 31638 signals
Max msgqueue size 819200 819200 bytes
Max nice priority 0 0
Max realtime priority 0 0
Max realtime timeout unlimited unlimited us
$ flutter run
Launching lib/main.dart on SM S***N in debug mode...
e: file:///home/doogle/.pub-cache/hosted/pub.dev/kakao_flutter_sdk_common-1.8.0/android/src/main/kotlin/com/kakao/sdk/flutter/FollowChannelHandlerActivity.kt:5:38 Unresolved reference: CustomTabsActivity
e: file:///home/doogle/.pub-cache/hosted/pub.dev/kakao_flutter_sdk_common-1.8.0/android/src/main/kotlin/com/kakao/sdk/flutter/FollowChannelHandlerActivity.kt:6:5 'onNewIntent' overrides nothing
e: file:///home/doogle/.pub-cache/hosted/pub.dev/kakao_flutter_sdk_common-1.8.0/android/src/main/kotlin/com/kakao/sdk/flutter/FollowChannelHandlerActivity.kt:7:15 Unresolved reference: onNewIntent
e: file:///home/doogle/.pub-cache/hosted/pub.dev/kakao_flutter_sdk_common-1.8.0/android/src/main/kotlin/com/kakao/sdk/flutter/FollowChannelHandlerActivity.kt:11:9 Unresolved reference: setResult
e: file:///home/doogle/.pub-cache/hosted/pub.dev/kakao_flutter_sdk_common-1.8.0/android/src/main/kotlin/com/kakao/sdk/flutter/FollowChannelHandlerActivity.kt:11:19 Unresolved reference: RESULT_OK
e: file:///home/doogle/.pub-cache/hosted/pub.dev/kakao_flutter_sdk_common-1.8.0/android/src/main/kotlin/com/kakao/sdk/flutter/FollowChannelHandlerActivity.kt:12:9 Unresolved reference: finish
e: file:///home/doogle/.pub-cache/hosted/pub.dev/kakao_flutter_sdk_common-1.8.0/android/src/main/kotlin/com/kakao/sdk/flutter/IntentFactory.kt:59:27 Unresolved reference: AuthCodeCustomTabsActivity
e: file:///home/doogle/.pub-cache/hosted/pub.dev/kakao_flutter_sdk_common-1.8.0/android/src/main/kotlin/com/kakao/sdk/flutter/KakaoFlutterSdkPlugin.kt:41:40 Unresolved reference: Utility
e: file:///home/doogle/.pub-cache/hosted/pub.dev/kakao_flutter_sdk_common-1.8.0/android/src/main/kotlin/com/kakao/sdk/flutter/KakaoFlutterSdkPlugin.kt:51:36 Unresolved reference: Utility
e: file:///home/doogle/.pub-cache/hosted/pub.dev/kakao_flutter_sdk_common-1.8.0/android/src/main/kotlin/com/kakao/sdk/flutter/KakaoFlutterSdkPlugin.kt:57:36 Unresolved reference: Utility
e: file:///home/doogle/.pub-cache/hosted/pub.dev/kakao_flutter_sdk_common-1.8.0/android/src/main/kotlin/com/kakao/sdk/flutter/KakaoFlutterSdkPlugin.kt:82:55 Unresolved reference: AuthCodeCustomTabsActivity
e: file:///home/doogle/.pub-cache/hosted/pub.dev/kakao_flutter_sdk_common-1.8.0/android/src/main/kotlin/com/kakao/sdk/flutter/KakaoFlutterSdkPlugin.kt:100:26 Unresolved reference: Utility
e: file:///home/doogle/.pub-cache/hosted/pub.dev/kakao_flutter_sdk_common-1.8.0/android/src/main/kotlin/com/kakao/sdk/flutter/KakaoFlutterSdkPlugin.kt:121:36 Unresolved reference: Utility
e: file:///home/doogle/.pub-cache/hosted/pub.dev/kakao_flutter_sdk_common-1.8.0/android/src/main/kotlin/com/kakao/sdk/flutter/KakaoFlutterSdkPlugin.kt:130:36 Unresolved reference: Utility
e: file:///home/doogle/.pub-cache/hosted/pub.dev/kakao_flutter_sdk_common-1.8.0/android/src/main/kotlin/com/kakao/sdk/flutter/KakaoFlutterSdkPlugin.kt:143:22 Unresolved reference: Utility
e: file:///home/doogle/.pub-cache/hosted/pub.dev/kakao_flutter_sdk_common-1.8.0/android/src/main/kotlin/com/kakao/sdk/flutter/KakaoFlutterSdkPlugin.kt:171:55 Type argument is not within its bounds: should be subtype of 'Activity'
e: file:///home/doogle/.pub-cache/hosted/pub.dev/kakao_flutter_sdk_common-1.8.0/android/src/main/kotlin/com/kakao/sdk/flutter/KakaoFlutterSdkPlugin.kt:218:49 Unresolved reference: IntentResolveClient
e: file:///home/doogle/.pub-cache/hosted/pub.dev/kakao_flutter_sdk_common-1.8.0/android/src/main/kotlin/com/kakao/sdk/flutter/KakaoFlutterSdkPlugin.kt:237:21 Unresolved reference: Utility
e: file:///home/doogle/.pub-cache/hosted/pub.dev/kakao_flutter_sdk_common-1.8.0/android/src/main/kotlin/com/kakao/sdk/flutter/KakaoFlutterSdkPlugin.kt:258:21 Unresolved reference: Utility
e: file:///home/doogle/.pub-cache/hosted/pub.dev/kakao_flutter_sdk_common-1.8.0/android/src/main/kotlin/com/kakao/sdk/flutter/KakaoFlutterSdkPlugin.kt:274:40 Unresolved reference: Utility
FAILURE: Build failed with an exception.
* What went wrong:
Execution failed for task ':kakao_flutter_sdk_common:compileDebugKotlin'.
> A failure occurred while executing org.jetbrains.kotlin.compilerRunner.GradleCompilerRunnerWithWorkers$GradleKotlinCompilerWorkAction
> Compilation error. See log for more details
* Try:
> Run with --stacktrace option to get the stack trace.
> Run with --info or --debug option to get more log output.
> Run with --scan to get full insights.
* Get more help at https://help.gradle.org
BUILD FAILED in 8s
Running Gradle task 'assembleDebug'... 8.9s
Exception: Gradle task assembleDebug failed with exit code 1
갑자기 에러가 나서 구글링해보는데 app/build.gradle 파일에 있는 ex.kotlin_version 을 올려보라는 말이 있어서 해보니 정상적으로 빌드가 됩니다. 휴…
buildscript {
ext.kotlin_version = '1.9.21'
...
}
위 ext.kotlin_version = ‘1.9.21’ 부분을 ext.kotlin_version = ‘1.9.22’ 로 변경하고 다시 flutter run 을 실행해보니 잘 빌드되네요. 순간 당황했습니다.
지난 글에 이어 도커 컨테이너 내에 저장하던 로그를 stdout, stderr로 출력하도록 Dockerfile 을 수정해 빌드 해서 일단 컨테이너 내에 저장하는 것은 막았지만 결국 도커에서는 컨테이너에서 생성된 로그를 자동으로 *-json.log라는 파일로 저장해 주고 있었습니다.
도커 엔진 서비스의 기본 설정으로는 이 로그가 용량 제한 없이 저장되기 때문에 또다시 몇 달 뒤 파일시스템 용량 초과 문제가 생길게 뻔하죠.
결국 다른 경로로 로그를 저장하던지 아니면 우분투 기본 로그 파일 저장 방식처럼 일정 기간 적당히 잘라서 저장하고 그보다 오래된 것은 순차적으로 삭제해서 저장 공간을 유지하도록 해야 합니다.
구글에서 검색해 보니 도커는 1.8 버전 이후로 로그 저장 드라이버나 최대 저장 용량, 로테이션 로깅 최대 개수등을 지정할 수 있도록 기능을 가지고 있었습니다.
도커 설정 파일인 /etc/docker/daemon.json 파일을 수정해 아래 내용을 추가합니다. (만약 파일이 없다면 새로 만들어서 작성하면 됩니다. 보통 도커는 처음 설치한 경우 daemon.json 파일이 없습니다)
위와 같이 하면 최대 100MiB까지 저장하고 로테이션 로그 파일을 10개까지 저장할 수 있도록 설정합니다.
당연히 도커 서비스를 재시작해야 합니다.
# systemctl status docker.service
또한 도커 서비스 재시작 전에 이미 떠있는 도커 컨테이너들도 적용하려면 마찬가지로 각 도커 컨테이너별로 재생성해줘야 로그 설정이 반영됩니다. (매우 중요)
저의 경우 아래와 같이 docker compose 를 사용하므로 아래와 같이 재시작하면 컨테이너를 재생성하게 됩니다. 이러면 로그 설정이 적용됩니다.
# docker compose down
# docker compose up -d
드디어 서버 저장 용량 초과 오류 걱정 없이 두발 쭉 뻗고 잘 수 있겠네요. ㅜㅜ
앞으로 해결할 점은 디버그 편의를 위해 프로젝트의 docker compose에 nginx 웹서버를 내장했었는데 이걸 릴리스 버전(혹은 프로덕션 버전)에서는 내장하지 않고 별도로 빼서 처리하는 구성 방법을 고민해 봐야겠습니다. 현재도 디버그 버전과 릴리스 버전이 슬슬 조금씩 설정이 달라지고 있거든요.
/var/lib/docker 폴더의 용량이 매우 크게 증가해서 서버가 용량 문제로 죽어버리는 경우가 발생한 것인데요. /var 가 포함된 / 파티션 용량 자체가 작게 해둔 문제도 있지만 이상하게 docker 경로가 용량이 폭증하는 문제의 원인을 알 수 없더군요.
현재 확실한 원인은 찾지 못했지만 잠정적으로는 컨테이너 내에 의도치 않게 쌓이는 데이터들이 문제라고 의심 중입니다. 특히 로그 파일이나 세션 파일 등입니다.
그래서 일단 PHP에서 파일세션을 사용하는데 이를 Redis로 전환했습니다.
일단 웹페이지 로딩 속도도 개선되고 좋습니다. 근데 세션 때문에 용량이 과다하게 증가하는 문제가 모두 해결된 거 같지는 않았습니다.
더 찾아보니 제가 한 컨테이너에 2가지 데몬을 실행시키려고 supervisord 서비스를 이용하고 있는데 이 설정에 문제가 있는 것 같았습니다.
기존 설정은 아래와 같습니다.
; supervisor config file
[unix_http_server]
file=/var/run/supervisor.sock ; (the path to the socket file)
chmod=0700 ; sockef file mode (default 0700)
[supervisord]
logfile=/var/log/supervisor/supervisord.log ; (main log file;default $CWD/supervisord.log)
pidfile=/var/run/supervisord.pid ; (supervisord pidfile;default supervisord.pid)
childlogdir=/var/log/supervisor ; ('AUTO' child log dir, default $TEMP)
nodaemon=true
user=root
; the below section must remain in the config file for RPC
; (supervisorctl/web interface) to work, additional interfaces may be
; added by defining them in separate rpcinterface: sections
[rpcinterface:supervisor]
supervisor.rpcinterface_factory = supervisor.rpcinterface:make_main_rpcinterface
[supervisorctl]
serverurl=unix:///var/run/supervisor.sock ; use a unix:// URL for a unix socket
; The [include] section can just contain the "files" setting. This
; setting can list multiple files (separated by whitespace or
; newlines). It can also contain wildcards. The filenames are
; interpreted as relative to this file. Included files *cannot*
; include files themselves.
[include]
files = /etc/supervisor/conf.d/*.conf
[program:nginx]
command=/usr/sbin/nginx -g "daemon off;"
autostart=true
autorestart=true
umask=0
[program:php-fpm5.6]
command=/usr/sbin/php-fpm5.6
autostart=true
autorestart=true
umask=0
이렇게 해서 Dockerfile에서 적용해 빌드 해서 한 컨테이너에 Nginx 와 PHP-FPM 서비스를 같이 돌리고 있습니다.
# docker compose build
# docker compose up -d
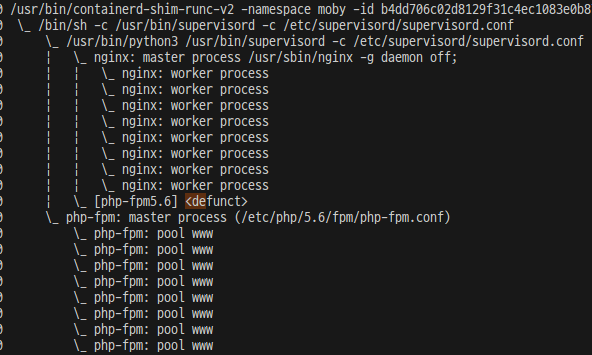
이렇게 빌드 후 실행해서 프로세스 상태를 보면 아래와 같이 조금 이상한 부분이 있습니다.
php-fpm 이 좀 이상합니다.
[php-fpm5.6] <defunct>로 supervisord 에서 실행된 php-fpm 프로세스는 죽어 있고 별도로 php-fpm 프로세스가 떠있습니다.
로그들을 분석하다 보니 php-fpm5.6 이 계속 이미 따로 떠있어서 실행할 수 없다고 supervisord의 로그 쪽에 나오는거 같네요. 위 설정에서 autorestart 설정이 있기때문에 죽은 php-fpm5.6 프로세스를 계속 재시작하는 것 같습니다.
결론은 docker 컨테이너나 supervisord 에서도 데몬으로 띄우지 않아야 정상적으로 작동하는데 데몬형태로 서비스를 띄워버려서 문제가 된 것입니다.
일단 위의 superviserd.conf 파일을 수정해야 합니다.
command=/usr/sbin/php-fpm5.6
;이부분을 다음과 같이 변경합니다.
command=/usr/sbin/php-fpm5.6 -F
이렇게 하면 데몬으로 뜨지 않고 일반 프로세스로 실행됩니다.
여기에 로그내용을 docker에서 확인할 수 있도록 supervisor.conf에 각 서비스 별로 아래 로그 저장을 stdout, stderr로 보내도록 설정합니다.
; supervisor config file
[unix_http_server]
file=/var/run/supervisor.sock ; (the path to the socket file)
chmod=0700 ; sockef file mode (default 0700)
[supervisord]
logfile=/var/log/supervisor/supervisord.log ; (main log file;default $CWD/supervisord.log)
pidfile=/var/run/supervisord.pid ; (supervisord pidfile;default supervisord.pid)
childlogdir=/var/log/supervisor ; ('AUTO' child log dir, default $TEMP)
nodaemon=true
user=root
; the below section must remain in the config file for RPC
; (supervisorctl/web interface) to work, additional interfaces may be
; added by defining them in separate rpcinterface: sections
[rpcinterface:supervisor]
supervisor.rpcinterface_factory = supervisor.rpcinterface:make_main_rpcinterface
[supervisorctl]
serverurl=unix:///var/run/supervisor.sock ; use a unix:// URL for a unix socket
; The [include] section can just contain the "files" setting. This
; setting can list multiple files (separated by whitespace or
; newlines). It can also contain wildcards. The filenames are
; interpreted as relative to this file. Included files *cannot*
; include files themselves.
[include]
files = /etc/supervisor/conf.d/*.conf
[program:nginx]
command=/usr/sbin/nginx -g "daemon off;"
autostart=true
autorestart=true
umask=0
; 로그파일을 만들어서 컨테이너에 쌓이도록 하면 안된다. 표준 출력으로 내보낸다.
stdout_logfile=/dev/stdout
stdout_logfile_maxbytes=0
stderr_logfile=/dev/stderr
stderr_logfile_maxbytes=0
[program:php-fpm5.6]
command=/usr/sbin/php-fpm5.6 -F
;command=/usr/sbin/php-fpm5.6 --nodaemoize --fpm-config=/etc/php/5.6/fpm/pool.d/www.conf
autostart=true
autorestart=true
umask=0
; 로그파일을 만들어서 컨테이너에 쌓이도록 하면 안된다. 표준 출력으로 내보낸다.
stdout_logfile=/dev/stdout
stdout_logfile_maxbytes=0
stderr_logfile=/dev/stderr
stderr_logfile_maxbytes=0
이제 이렇게 변경 후 재 빌드 해서 사용하면 php-fpm 도 foreground process 로 떠서 superviserd 가 잡고 있고 로그도 docker logs 등의 명령으로 확인할 수 있습니다.
댓글을 달려면 로그인해야 합니다.