STRAPI를 사용해 보려고 기본 세팅으로 시작해보니 sqlite를 기본 디비로 사용하고 있더군요. 간단한 기능은 이 디비로 가능하지만 제대로 하려면 역시 최소한 MySQL (MariaDB) 를 사용해야 합니다.
(더 보기…)[카테고리:] Docker
-

도커 컨테이너의 로그 파일 용량 제한하기
지난 글에 이어 도커 컨테이너 내에 저장하던 로그를 stdout, stderr로 출력하도록 Dockerfile 을 수정해 빌드 해서 일단 컨테이너 내에 저장하는 것은 막았지만 결국 도커에서는 컨테이너에서 생성된 로그를 자동으로 *-json.log라는 파일로 저장해 주고 있었습니다.
도커 엔진 서비스의 기본 설정으로는 이 로그가 용량 제한 없이 저장되기 때문에 또다시 몇 달 뒤 파일시스템 용량 초과 문제가 생길게 뻔하죠.
결국 다른 경로로 로그를 저장하던지 아니면 우분투 기본 로그 파일 저장 방식처럼 일정 기간 적당히 잘라서 저장하고 그보다 오래된 것은 순차적으로 삭제해서 저장 공간을 유지하도록 해야 합니다.
구글에서 검색해 보니 도커는 1.8 버전 이후로 로그 저장 드라이버나 최대 저장 용량, 로테이션 로깅 최대 개수등을 지정할 수 있도록 기능을 가지고 있었습니다.
도커 설정 파일인 /etc/docker/daemon.json 파일을 수정해 아래 내용을 추가합니다. (만약 파일이 없다면 새로 만들어서 작성하면 됩니다. 보통 도커는 처음 설치한 경우 daemon.json 파일이 없습니다)
{
  "log-driver": "json-file",
  "log-opts": {
    "max-size": "100m",
    "max-file": "10",
    "labels": "production_status",
    "env": "os,customer"
  }
}
위와 같이 하면 최대 100MiB까지 저장하고 로테이션 로그 파일을 10개까지 저장할 수 있도록 설정합니다.
당연히 도커 서비스를 재시작해야 합니다.
# systemctl restart docker.service또한 도커 서비스 재시작 전에 이미 떠있는 도커 컨테이너들도 적용하려면 마찬가지로 각 도커 컨테이너별로 재생성해줘야 로그 설정이 반영됩니다. (매우 중요)
저의 경우 아래와 같이 docker compose 를 사용하므로 아래와 같이 재시작하면 컨테이너를 재생성하게 됩니다. 이러면 로그 설정이 적용됩니다.
# docker compose down
# docker compose up -d
드디어 서버 저장 용량 초과 오류 걱정 없이 두발 쭉 뻗고 잘 수 있겠네요. ㅜㅜ
앞으로 해결할 점은 디버그 편의를 위해 프로젝트의 docker compose에 nginx 웹서버를 내장했었는데 이걸 릴리스 버전(혹은 프로덕션 버전)에서는 내장하지 않고 별도로 빼서 처리하는 구성 방법을 고민해 봐야겠습니다. 현재도 디버그 버전과 릴리스 버전이 슬슬 조금씩 설정이 달라지고 있거든요.
참고자료
-

도커 컨테이너 생성시 supervisord 사용할 때 유의할 점
도커 컴포즈를 통해 Nginx + PHP-FPM + MySQL 환경을 운영하고 있는데요.
간헐적으로 큰 문제가 발생합니다.
/var/lib/docker 폴더의 용량이 매우 크게 증가해서 서버가 용량 문제로 죽어버리는 경우가 발생한 것인데요. /var 가 포함된 / 파티션 용량 자체가 작게 해둔 문제도 있지만 이상하게 docker 경로가 용량이 폭증하는 문제의 원인을 알 수 없더군요.
현재 확실한 원인은 찾지 못했지만 잠정적으로는 컨테이너 내에 의도치 않게 쌓이는 데이터들이 문제라고 의심 중입니다. 특히 로그 파일이나 세션 파일 등입니다.
그래서 일단 PHP에서 파일세션을 사용하는데 이를 Redis로 전환했습니다.
일단 웹페이지 로딩 속도도 개선되고 좋습니다. 근데 세션 때문에 용량이 과다하게 증가하는 문제가 모두 해결된 거 같지는 않았습니다.
더 찾아보니 제가 한 컨테이너에 2가지 데몬을 실행시키려고 supervisord 서비스를 이용하고 있는데 이 설정에 문제가 있는 것 같았습니다.
기존 설정은 아래와 같습니다.
; supervisor config file

[unix_http_server]
file=/var/run/supervisor.sock   ; (the path to the socket file)
chmod=0700                       ; sockef file mode (default 0700)

[supervisord]
logfile=/var/log/supervisor/supervisord.log ; (main log file;default $CWD/supervisord.log)
pidfile=/var/run/supervisord.pid ; (supervisord pidfile;default supervisord.pid)
childlogdir=/var/log/supervisor            ; ('AUTO' child log dir, default $TEMP)
nodaemon=true
user=root

; the below section must remain in the config file for RPC
; (supervisorctl/web interface) to work, additional interfaces may be
; added by defining them in separate rpcinterface: sections
[rpcinterface:supervisor]
supervisor.rpcinterface_factory = supervisor.rpcinterface:make_main_rpcinterface

[supervisorctl]
serverurl=unix:///var/run/supervisor.sock ; use a unix:// URL  for a unix socket

; The [include] section can just contain the "files" setting.  This
; setting can list multiple files (separated by whitespace or
; newlines).  It can also contain wildcards.  The filenames are
; interpreted as relative to this file.  Included files *cannot*
; include files themselves.

[include]
files = /etc/supervisor/conf.d/*.conf

[program:nginx]
command=/usr/sbin/nginx -g "daemon off;"
autostart=true
autorestart=true
umask=0

[program:php-fpm5.6]
command=/usr/sbin/php-fpm5.6
autostart=true
autorestart=true
umask=0
이렇게 해서 Dockerfile에서 적용해 빌드 해서 한 컨테이너에 Nginx 와 PHP-FPM 서비스를 같이 돌리고 있습니다.
# docker compose build
# docker compose up -d
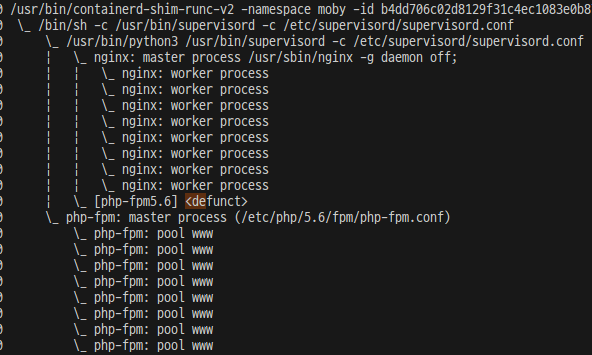
이렇게 빌드 후 실행해서 프로세스 상태를 보면 아래와 같이 조금 이상한 부분이 있습니다.

php-fpm 이 좀 이상합니다.
[php-fpm5.6] <defunct>로 supervisord 에서 실행된 php-fpm 프로세스는 죽어 있고 별도로 php-fpm 프로세스가 떠있습니다.
로그들을 분석하다 보니 php-fpm5.6 이 계속 이미 따로 떠있어서 실행할 수 없다고 supervisord의 로그 쪽에 나오는거 같네요. 위 설정에서 autorestart 설정이 있기때문에 죽은 php-fpm5.6 프로세스를 계속 재시작하는 것 같습니다.
결론은 docker 컨테이너나 supervisord 에서도 데몬으로 띄우지 않아야 정상적으로 작동하는데 데몬형태로 서비스를 띄워버려서 문제가 된 것입니다.
일단 위의 superviserd.conf 파일을 수정해야 합니다.
command=/usr/sbin/php-fpm5.6

;이부분을 다음과 같이 변경합니다.

command=/usr/sbin/php-fpm5.6 -F
이렇게 하면 데몬으로 뜨지 않고 일반 프로세스로 실행됩니다.
여기에 로그내용을 docker에서 확인할 수 있도록 supervisor.conf에 각 서비스 별로 아래 로그 저장을 stdout, stderr로 보내도록 설정합니다.
stdout_logfile=/dev/stdout
stdout_logfile_maxbytes=0
stderr_logfile=/dev/stderr
stderr_logfile_maxbytes=0
최종적으로 superviserd.conf는 다음과 같이 변경했습니다.
; supervisor config file

[unix_http_server]
file=/var/run/supervisor.sock   ; (the path to the socket file)
chmod=0700                       ; sockef file mode (default 0700)

[supervisord]
logfile=/var/log/supervisor/supervisord.log ; (main log file;default $CWD/supervisord.log)
pidfile=/var/run/supervisord.pid ; (supervisord pidfile;default supervisord.pid)
childlogdir=/var/log/supervisor            ; ('AUTO' child log dir, default $TEMP)
nodaemon=true
user=root

; the below section must remain in the config file for RPC
; (supervisorctl/web interface) to work, additional interfaces may be
; added by defining them in separate rpcinterface: sections
[rpcinterface:supervisor]
supervisor.rpcinterface_factory = supervisor.rpcinterface:make_main_rpcinterface

[supervisorctl]
serverurl=unix:///var/run/supervisor.sock ; use a unix:// URL  for a unix socket

; The [include] section can just contain the "files" setting.  This
; setting can list multiple files (separated by whitespace or
; newlines).  It can also contain wildcards.  The filenames are
; interpreted as relative to this file.  Included files *cannot*
; include files themselves.

[include]
files = /etc/supervisor/conf.d/*.conf

[program:nginx]
command=/usr/sbin/nginx -g "daemon off;"
autostart=true
autorestart=true
umask=0
; 로그파일을 만들어서 컨테이너에 쌓이도록 하면 안된다. 표준 출력으로 내보낸다.
stdout_logfile=/dev/stdout
stdout_logfile_maxbytes=0
stderr_logfile=/dev/stderr
stderr_logfile_maxbytes=0

[program:php-fpm5.6]
command=/usr/sbin/php-fpm5.6 -F
;command=/usr/sbin/php-fpm5.6 --nodaemoize --fpm-config=/etc/php/5.6/fpm/pool.d/www.conf
autostart=true
autorestart=true
umask=0
; 로그파일을 만들어서 컨테이너에 쌓이도록 하면 안된다. 표준 출력으로 내보낸다.
stdout_logfile=/dev/stdout
stdout_logfile_maxbytes=0
stderr_logfile=/dev/stderr
stderr_logfile_maxbytes=0
이제 이렇게 변경 후 재 빌드 해서 사용하면 php-fpm 도 foreground process 로 떠서 superviserd 가 잡고 있고 로그도 docker logs 등의 명령으로 확인할 수 있습니다.
이제 로그도 불필요하게 도커 컨테이너에 쌓이지 않게 되었습니다.
이제는 서비스가 장기적으로 잘 떠있는지 확인해 봐야겠습니다.
-

윈도우환경에서 도커로 MariaDB 실행시 경고 해결하기
윈도우10 혹은 11 환경에서 도커로 MySQL 이나 MariaDB 띄우는 경우 보통 설정파일들을 수정할 수 있도록 빼놓는데요. 이런 경우 리눅스 환경과는 달리 아래와 같은 오류가 발생합니다.
Warning: World-writable config file '/etc/mysql/mariadb.conf.d/50-server.cnf' is ignored50-server.cnf 란 파일이 쓰기 가능이어서 경고가 발생합니다. 이는 윈도우 환경과 리눅스환경이 파일시스템이 다르기 때문인데요.
리눅스에서는 쓰기 권한이 없는 파일들이 윈도우 환경으로 오면 기본적으로 전체 쓰기 가능한 권한으로 인식하기 때문이죠.
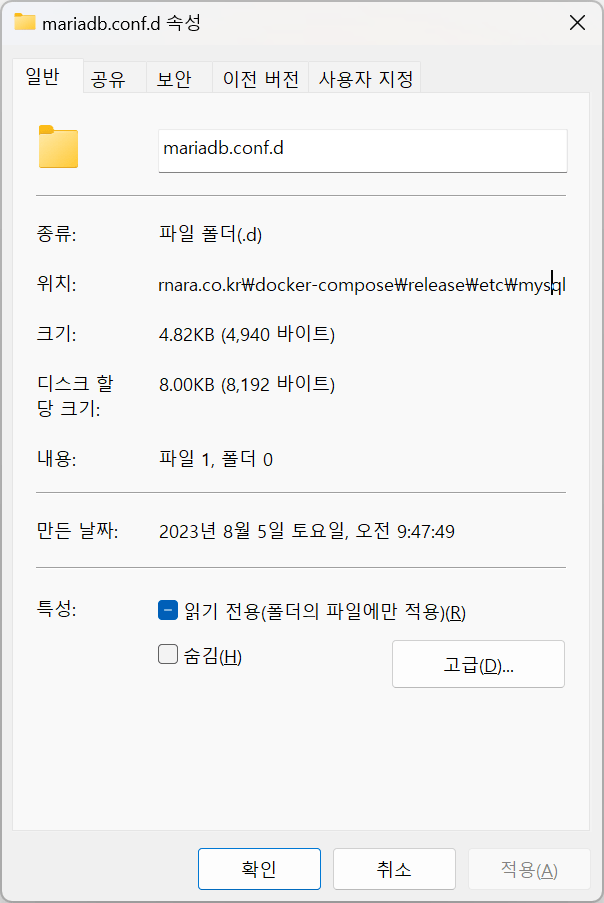
그런데 윈도우 환경에서도 쓰기권한을 끄는 방법이 있습니다. 파일 속성창에 가면 읽기 전용으로 바꾸면 마찬가지로 도커내에서 쓰기 권한이 없는 것으로 인식합니다.

설정파일에서 마우스오른쪽버튼 클릭하여 속성메뉴 클릭 후 위 창에서 읽기 전용을 체크하면 된다. 이렇게 하면 위의 경고 메시지가 나오지 않습니다.
참고자료
-

우분투 리눅스에서 /etc/cron.d/ (혹은 기타 /etc/cron.daily 등)에 docker exec -it 명령문 호출하지 않는 경우 해결 방법
# sudo docker exec -it /do/somthingcron.d 에 docker exec 명령문을 수행하도록 추가하는 경우 습관적으로 -it 플래그를 붙이는 경우가 있습니다. -it 플래그를 붙여 실행하면 보통 도커 컨테이너에 쉘(shell)로 접속해 여러 가지 명령어를 직접 실행하기에 좋은데요.
(더 보기…) -

도커 재설치 후 컨테이너 간 접속이 안되고 계속 무응답 타임아웃 나는 경우 해결 방법
우분투 22.04 서버에 snap 을 이용해 도커를 설치해서 사용 중이었는데요 뭔가 문제가 있어서 snap 버전을 삭제하고 docker 공식 홈페이지에 나온 docker engine 설치 방법에 따라 다시 설치하였습니다.
(더 보기…) -
몽고디비 서버가 구동되지 않는 오류 해결하기
개발중인 프로젝트에 도커를 도입하려고 하는데 몽고디비까지 추가해보려고 하다가 원래대로 되돌리려는 중 오류가 발생했습니다.
몽고디비를 아래과 같이 시작해보면 아무런 반응이 없네요.
$ sudo systemctl start mongod현재 서비스 상태를 확인해 봅니다.
$ sudo systemctl status mongod
● mongod.service - MongoDB Database Server
   Loaded: loaded (/lib/systemd/system/mongod.service; enabled; vendor preset: enabled)
   Active: failed (Result: exit-code) since Fri 2019-04-19 14:00:59 KST; 3min 45s ago
     Docs: https://docs.mongodb.org/manual
  Process: 7925 ExecStart=/usr/bin/mongod --config /etc/mongod.conf (code=exited, status=100)
 Main PID: 7925 (code=exited, status=100)
      CPU: 21ms

 4월 19 14:00:59 doogle-ubuntu systemd[1]: Started MongoDB Database Server.
 4월 19 14:00:59 doogle-ubuntu systemd[1]: mongod.service: Main process exited, code=exited, status=100/n/a
 4월 19 14:00:59 doogle-ubuntu systemd[1]: mongod.service: Unit entered failed state.
 4월 19 14:00:59 doogle-ubuntu systemd[1]: mongod.service: Failed with result 'exit-code'.
서비스가 실패상태입니다. 당연히 몽고디비 서버는 떠있지 않네요.
로그 기록을 확인해 보면…
$ sudo tail mongod.log
2019-04-19T14:00:59.937+0900 I CONTROL  [initandlisten] build environment:
2019-04-19T14:00:59.937+0900 I CONTROL  [initandlisten]     distmod: ubuntu1604
2019-04-19T14:00:59.937+0900 I CONTROL  [initandlisten]     distarch: x86_64
2019-04-19T14:00:59.937+0900 I CONTROL  [initandlisten]     target_arch: x86_64
2019-04-19T14:00:59.937+0900 I CONTROL  [initandlisten] options: { config: "/etc/mongod.conf", net: { bindIp: "127.0.0.1", port: 27017 }, processManagement: { timeZoneInfo: "/usr/share/zoneinfo" }, storage: { dbPath: "/var/lib/mongodb", journal: { enabled: true } }, systemLog: { destination: "file", logAppend: true, path: "/var/log/mongodb/mongod.log" } }
2019-04-19T14:00:59.937+0900 I STORAGE  [initandlisten] exception in initAndListen: IllegalOperation: Attempted to create a lock file on a read-only directory: /var/lib/mongodb, terminating
2019-04-19T14:00:59.937+0900 I NETWORK  [initandlisten] shutdown: going to close listening sockets...
2019-04-19T14:00:59.937+0900 I NETWORK  [initandlisten] removing socket file: /tmp/mongodb-27017.sock
2019-04-19T14:00:59.937+0900 I CONTROL  [initandlisten] now exiting
2019-04-19T14:00:59.937+0900 I CONTROL  [initandlisten] shutting down with code:100
밑에서 5번째 줄을 보면 원인을 확인 할 수 있습니다.
Attempted to create a lock file on a read-only directory: /var/lib/mongodb, terminating
/var/lib/mongodb 디렉토리가 읽기만 가능해서 lock 파일을 생성할 수 없는거 같네요.
경로 권한을 확인해 봅니다.
$ sudo ls -al
... (중략)...
drwxr-xr-x  4           999 mongodb       32768  4월 19 13:34 mongodb/
... (중략)...
보시는 바와 같이 디렉토리 및 하위 파일들 포함 모두 사용자가 바뀌었습니다. 아무래도 도커버전의 몽고디비가 한 짓(?)인거 같네요.
다음과 같이 권한을 복구해 줍니다.
$ sudo chown -R mongodb:mongodb mongodb이제 다시 서비스를 시작하면 되겠습니다.
$ sudo systemctl start mongod서비스 상태를 봐보면 정상적으로 구동중이라는 것을 확인할 수 있습니다.
$ sudo systemctl status mongod
● mongod.service - MongoDB Database Server
   Loaded: loaded (/lib/systemd/system/mongod.service; enabled; vendor preset: enabled)
   Active: active (running) since Fri 2019-04-19 14:20:36 KST; 13s ago
     Docs: https://docs.mongodb.org/manual
 Main PID: 9963 (mongod)
    Tasks: 27
   Memory: 148.4M
      CPU: 926ms
   CGroup: /system.slice/mongod.service
           └─9963 /usr/bin/mongod --config /etc/mongod.conf

 4월 19 14:20:36 doogle-ubuntu systemd[1]: Started MongoDB Database Server.
리눅스에서는 항상 파일 권한 문제가 생길 수 있습니다. 주의하시기 바랍니다.
-
Docker Composer 오류 해결하기 – services.server.build contains unsupported option: ‘image’
아래와 같이 docker-composer 실행하면 바로 에러가 뜨는 경우가 있는데요.
(더 보기…)ERROR: The Compose file './docker-compose.yml' is invalid because: services.server.ports contains an invalid type, it should be an array services.server.build contains unsupported option: 'image' -
실무에서 사용하기 위한 docker 활용법 – private docker registry 구축하기
docker 를 알아보다 보면 슬슬 실무에 적용해 보고 싶어지는데요. 실제로 배포등을 처리하려면 docker hub 가 필요합니다. 하지만 docker hub 는 계정당 1개만 private 저장소를 지원하는데요.
이를 해결하기 위해서는 자체적으로 구축한 도커 저장소가 있는게 아무래도 편하겠죠?
(더 보기…) -
docker 이미지 저장 경로 변경하기
docker의 경우 이미지 때문에 기본적으로 용량을 많이 차지한다. 그래서 기본 파티션이 용량이 작은 경우 추가로 붙인 볼륨의 파티션으로 경로를 변경해줄 필요가 있다.
먼저 아래와 같이 도커 설정 파일을 만든다.
$ sudo vi /etc/docker/daemon.json설정 파일에 아래와 같은 json 형식으로 설정값을 지정하면 된다.
{
    "graph": "/원하는/경로"
}
마지막으로 docker 서비스를 재시작하면 된다.
$ sudo systemctl restart docker이제 해당 경로로 가보면 docker 에서 생성한 여러 폴더들을 볼 수 있다.
$ cd /원하는/경로
$ ls -al
total 0
drwx--x--x 14 root root 182 Jan 14 18:11 ./
drwxr-xr-x  3 root root  20 Jan 14 16:11 ../
drwx------  2 root root  24 Jan 14 18:11 builder/
drwx------  4 root root  92 Jan 14 18:11 buildkit/
drwx------  2 root root   6 Jan 14 18:11 containers/
drwx------  3 root root  22 Jan 14 18:11 image/
drwxr-x---  3 root root  19 Jan 14 18:11 network/
drwx------  3 root root  40 Jan 14 18:11 overlay2/
drwx------  4 root root  32 Jan 14 18:11 plugins/
drwx------  2 root root   6 Jan 14 18:11 runtimes/
drwx------  2 root root   6 Jan 14 18:11 swarm/
drwx------  2 root root   6 Jan 14 18:11 tmp/
drwx------  2 root root   6 Jan 14 18:11 trust/
drwx------  2 root root  25 Jan 14 18:11 volumes/
이런식으로 나오면 정상적으로 경로가 변경된 것이다.
이렇게 하면 서버의 용량 부족 문제를 해결할 수 있다 ^^
만약 한창 사용중이라면 docker 서비스를 중단한후 rsync 로 이동시키면 사용할 수 있을것으로 예상해 본다.

댓글을 달려면 로그인해야 합니다.